


“The DOT now requires that we print the compaction data directly from the gyro. We use a 125X. Can you help me?”
Yes, we can help you.
We provide an explanation of related topics for a Pine 125X Superpave gyratory compactor with upgraded controls in a 3-part blog series. Screenshots shown are from revision V18.08a of the control software.
The first article discusses the basics—the data collected, 125X file capacity, data exporting options, file types, and file naming convention.
This second blog presents saving Pine 125X data to a USB flash drive or a PC.
The third publication describes printing Pine 125X data.
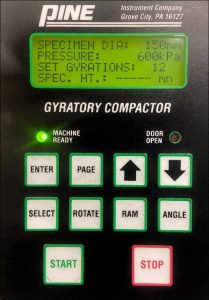
Menu Navigation
Navigate the 125X menu system using the buttons located beneath the display.
Saving Pine 125X Data Automatically to a USB Flash Drive
The 125X with upgraded controls automatically saves compaction data to a USB flash drive if the drive is installed in the machine prior to completion of compaction.
Saving Pine 125X Data Manually to a USB Flash Drive
Follow the steps below to manually save data file(s) from a 125X with upgraded controls to a USB flash drive.
- Select OTHER OPTIONS in the second screen of the Main Menu.

- Press ENTER.

- Select TEST DATA.
- Press ENTER.

- Select Save .DAT files.
- Press ENTER.

- Select the desired data file.
- Press ENTER.
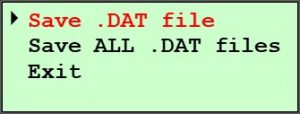
- Select Save .DAT file.
- Press ENTER.

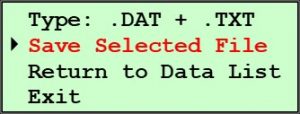
- Note that in this case, both a .DAT file and a .TXT file will be saved because this is what appears in the top row of this screen. If you wish to only save the .DAT file, select Type: .DAT + .TXT.
- Press the Up or Down Arrow button to toggle between options–.DAT + .TXT or .DAT.
- Press ENTER.
- Make sure a USB flash drive is inserted in the Data Port.
- Select Save Selected File.
- Press ENTER. A message screen appears stating that files are being saved. When saving is completed, the last screen will appear.
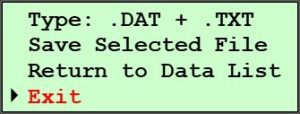
- Select Exit.
- Press ENTER
Selecting the .TXT File Format to Save
Read the first article in this series to see examples of the two .TXT formats—Wide-Brief and Wide-Full.
If you desire to save a .TXT file, set the file format to be saved using the following instructions.
- Select OTHER OPTIONS in the second screen of the Main Menu.
- Press ENTER.
- Select TEST DATA.
- Press ENTER.

- Select Print Report.
- Press ENTER.
- Select the desired data file.
- Press ENTER.

- The top row of the screen identifies the file format that will be printed. The options are Wide Format-Full, Wide Format-Brief, and Narrow. To save a Wide Format-Full .TXT file, the style line must display Full or Narrow. To save a Wide Format-Brief .TXT file, the style line must display Brief. To change the report style, select Style. Press ENTER. Then, use the Up or Down Arrow button to toggle to the desired format—Wide Full, Wide Brief, or Narrow. Finally, press ENTER.

- Select Exit.
- Press ENTER.
Saving Pine 125X Data Manually to a PC
The Pine 125X with upgraded controls can save height per gyration data directly to a PC via a serial port. Doing this requires a 9-pin Female-Female Null MODEM serial cable to connect the serial port of the 125X to the serial port of a PC.
Use the following procedure to transfer data from a Pine 125X to a PC via the serial port.
- Select OTHER OPTIONS in the second screen of the Main Menu.
- Press ENTER.
- Select TEST DATA.
- Press ENTER.

- Select Send Serial Data.
- Press ENTER.
- Select the desired file from which to transfer data.
- Press ENTER.

- Make sure the serial cable is properly connected and the program for receiving the data is running.
- Select Send Selected File.
- Press ENTER. When the transfer of the data is complete, the Data List screen will appear.
- Press ENTER if you are done saving or select another desired file, press Enter, and return to Step #9.

- Select Exit.
- Press ENTER.
Want to Learn More?
Review the first blog in this series on 125X data file basics and the article on printing from a 125X.
Do you have a Pine 125X with original controls? Learn about the upgraded controls package available from Pine.
Read similar collections of articles on a G2, a GB1, and a G1.
Visit our website or speak with one of our specialists at 724-458-6393.
Follow us on LinkedIn and Twitter and subscribe to our YouTube channel.